Every website owner knows how important site speed is for online success. Not only is it an important ranking factor but it has also been shown to have a dramatic effect on conversion rates, no matter what you’re trying to sell. Therefore using a CDN should be a no-brainer.
A content delivery network dramatically improves your page load times by cutting down the physical distance between your site’s static assets (images, JS, CSS etc) and the user’s browser. However many site owners are hesitant to make the move because setup can be hard and a poorly configured CDN can do more harm than good. Still, it is important that you don’t pass up on all the benefits just because there could be some potential downsides. If you are not comfortable taking on the configuration by yourself, you can always hire a freelance developer to do it for you.
In today’s post we’ll walk you through StackPath (MaxCDN) setup but the concepts explained here can be applied to any CDN. Let’s get started.
Note: It is recommended that you do this setup for a small test site first – preferably one that has a separate domain from your actual site – so there are no surprises when you are doing it for real.
Create your account
If you haven’t already, create an account on StackPath. Once you have done so, add a new site to your account.
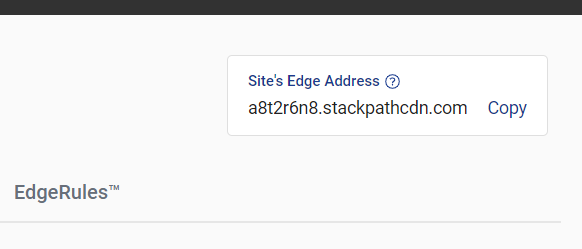
Take note of your “Site’s Edge Address” provided in your account (top right corner). We will need it later.
Domain name preparation
For SEO purposes we want all our static resources to be served from our own sub-domain instead of a StackPath URL. After all we don’t want the CDN to get credit for any of our content.
This requires some changes at the domain level. Log into to your domain management account and make sure you have the ability to add A and CNAME DNS records. Your domain provider should be able to provide you more precise information on how to do so. You can also check if instructions for your provider are included in this StackPath help article.
The A record is needed to point your domain name to your server’s IP address. You may have this record already, in which case skip to the CNAME record.
A CNAME record will be used to point your sub-domain cdn.yourdomain.com to the Site’s Edge Address we got in the first step. Once you’ve added this record and waited long enough for DNS to propagate, you should be able to open cdn.your.com in your browser and see a full copy of your site. Neat!
Requesting an SSL Certificate for your sub-domain
StackPath offers a free SSL certificate for your sub-domain, which is a great option, even if your main site doesn’t use the HTTPs protocol yet (why not though?). However if you are not interested in it, you can simply skip this section.
To request the free SSL certificate:
- In your StackPath account open the site
- Open the EdgeSSL tab
- In the section “Request Free SSL Certificate” click the “Generate Free SSL” button
- You will be asked to add another CNAME record to your domain for proof of ownership. Add the record in your domain management account
- Once the DNS changes propagate, your SSL certificate will be installed. For me this took a few hours.
I have not gone into more detail since StackPath has a step-by-step guide on this process that you can follow here.
If you face any problems while adding the new CNAME record you can follow this guide by Comodo (the company that will issue your SSL certificate).
Okay so now you should have a copy of your site accessible on https://cdn.yourdomain.com. Amazeballs!
Tweaking your CDN for SEO
If you’re anything like me, having a copy of your whole site on a different sub-domain must sound like a nightmare! Fortunately we can easily avoid any negative SEO consequences by following a few simple steps:
Make sure all your pages have a canonical tag
Each page on your site should have a canonical tag so that Google can tell which version of your content is the source, and which one is just a copy. The canonical tag looks like this:
<link rel="canonical" href="http://yourdomain.com" />In WordPress you can add the canonical tag to all your pages by using a plugin like SmartCrawl or Yoast SEO.
Make sure all static resources have HTTP canonical headers
Adding the canonical tag to the HTML of your pages is easy enough, but what about static resources like images? How can you tell Google which version of a particular image to use? HTTP canonical header is the answer. This HTTP header was introduced by Google for exactly this scenario. Having it in your response will indicate to Google that the version on your main site is the source and the one on the CDN is just a copy, and that your main site should get the credit.
So how do we add this header to all resources served by the CDN? You can do this by adding the header on your main site. Since all headers from the origin site are copied by the CDN, the canonical header will also be copied over. To add the header on your origin site add this to your .htaccess file:
<FilesMatch "\.(ico|pdf|flv|jpg|jpeg|png|gif|js|css|swf|webp|html)(\.gz)?(\?.*)?$">
            <IfModule mod_rewrite.c>
               RewriteEngine On
               RewriteCond %{HTTPS} !=on
               RewriteRule .* - [E=CANONICAL:http://%{HTTP_HOST}%{REQUEST_URI},NE]
               RewriteCond %{HTTPS} =on
               RewriteRule .* - [E=CANONICAL:https://%{HTTP_HOST}%{REQUEST_URI},NE]
            </IfModule>
            <IfModule mod_headers.c>
               Header set Link "<%{CANONICAL}e>; rel=\"canonical\""
            </IfModule>
         </FilesMatch>
Make sure nothing from the CDN is indexed
Canonicalizing everything on the CDN is a great way to avoid duplicate content penalties but Google may still choose to index the CDN URLs, which is not good. Fortunately StackPath makes it easy to avoid this issue through EdgeRules.
In your StackPath account go to the EdgeRules tab and at the bottom of the screen click the “Add Delivery Rule” button.

In the form the opens, add the following values and hit save:
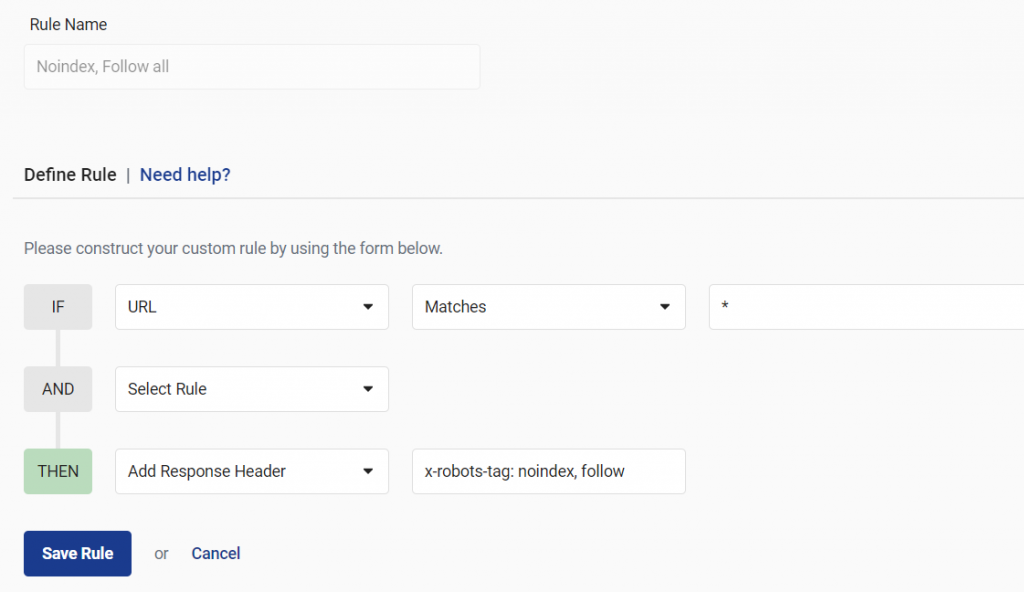
These values basically translate to: when any CDN URL is opened, add “x-robots-tag: noindex, follow” to the HTTP headers. This will tell Google that you don’t want any CDN URL to be indexed. You can find out more about the x-robots-tag header in this MOZ article.
That’s all! Your static resources are now available on the CDN, Google knows where the real version of each resource is and nothing should be indexed. You still need to configure your website to use the CDN version of all CSS, JS and image files. In WordPress this can be done with a plugin like W3 Total Cache.
Leave a reply